If you’re chasing power gains in a forced induction car, intercooler spray is an often-overlooked mod that could make a noticeable difference in keeping your car’s temperatures down.
Cooling is an essential (albeit not very exciting) element of how your engine performs, but it’s not just uprated radiators and aftermarket intercoolers which can help you out in this area. For example, on a forced induction motor, an intercooler’s job is to use the ambient air passing through it to cool the hot induction charge before it gets to the cylinders. Reducing intake temperatures equals a double-whammy of denser air for power, and less chance of detonation.
It stands to reason then, that anything that can make your intercooler more efficient is a good thing, and that’s what makes intercooler sprays so popular. In fact, some cars like Evos and Scoobys, have even had these as standard over the years.
Why does an intercooler spray work?
The science is sound. A liquid like water has to absorb heat in order to evaporate. This means, when you spray it on a surface, it will draw out heat until it can vaporize. The same reason it can be 30˚C on holiday but you’ll still freeze when you first get out of the pool.
Anyway, this evaporative cooling is what makes an intercooler spray reduce air charge temperatures. In some situations, this type of mod can be used for short-term cooling of your radiator too.
Required Equipment
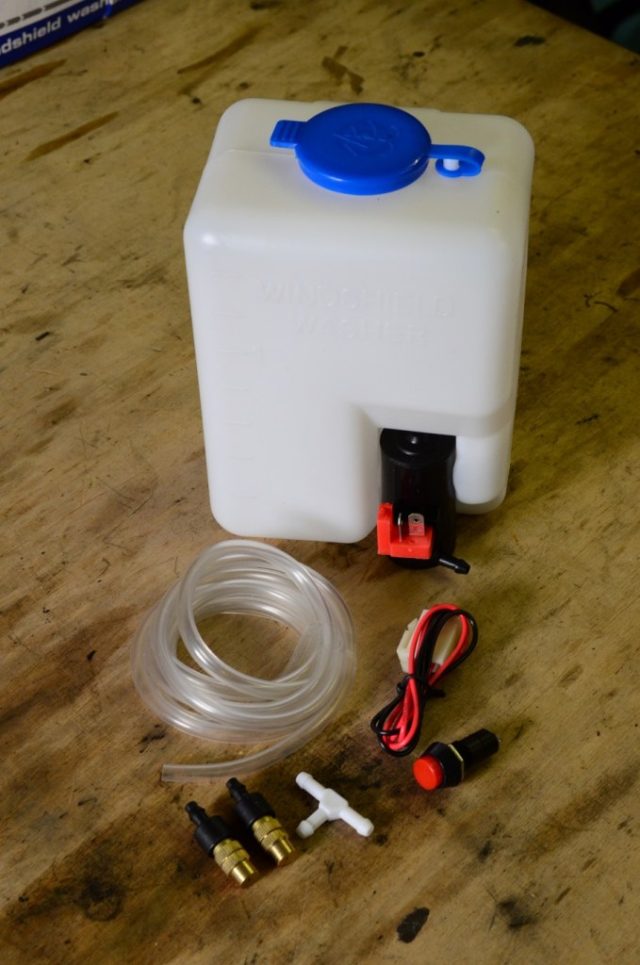
There are two popular ways of going about this job. You can either tap into your existing windscreen washers, or, as we have, get yourself a whole new kit.
There are advantages and disadvantages to both. If you’re using your standard washer bottle, all the wiring is already there; all you need do is mount some nozzles. Screen wash is very good for cooling too. Then again, it can be pretty bloody distracting having your windscreen soaked every time you hit the button, so some choose to install a manual cut-off valve or disconnect the washers altogether. This works well in the short term (say, on the track), but isn’t all that great, or very legal, on the road.
On the other hand, basic washer bottle kits for classic and kit cars are cheap. We got ours on eBay for well under a tenner and it comes with everything from a pump to fittings. The key thing to remember is that, ideally, you want the water to mist onto your intercooler, and standard washer jets are crap for that. So, spend a couple of quid extra and get yourself some misting nozzles from your local garden center. The downside of these kits of course, is that fitting takes a little longer. But that’s where we’re here to help.
Where to place your intercooler spray bottle
First things first. You need to find a good place to mount your bottle. Ideally keep it as far away from the engine as possible, so it doesn’t soak up loads of heat when the car is running. That said, remember that inside a bumper or under an arch is only a good idea if you can actually fill the bottle up when you need to! If you can get some air flow around the bottle through the grille though, all the better.
Some race setups mount these in the boot or even inside the car, but you’ll likely be needing loads of extra tubing and a more powerful pump for that.
Route Your Nozzles
We’ve got a large front-mount intercooler and have chosen a simple dual-nozzle setup, but you could have more. There are lots of different types of pipe connectors/fittings available, from tees to elbows, so it’s easy to run nozzles in a series. Some people even choose to make a ring, a bit like a NOS/C02 intercooler spray. Equally, a single nozzle may do the job for a smaller side or top-mount intercooler.
When attaching your nozzles, you can make all sorts of flashy brackets and the like, but often the simplest solution – a couple of cable ties, for instance – can be the best. If it’s not too permanent, you can move the nozzles around after testing.
Route Your Wiring
Although some specialist kits come with a temperature trigger, generally speaking you’ll be using a button, and this is going to have to be within easy reach of the driver’s seat. Once you’ve found somewhere to mount yours, you’ll need to run your wires through the bulkhead to the pump, and connect to a power source.
It’s always a good idea to install an inline fuse too, just in case. With it all plugged in, hit the button to make sure the pump is working, and then you can securely mount your bottle.
Spray Away!
Before you can test your new spray, you’ll have to fill up the bottle (obviously). Although it’s fine to use water and, in an ideal situation, you want it to be cold – don’t worry too much because it’ll inevitably heat up under the hood anyway. For drag racing and track work, some like to add ice, but the main point of these systems is to take advantage of evaporative cooling, rather than physical cooling with a cold liquid.
With that in mind, generally the best solution is to use a mix of water and alcohol, like a 50/50 mix of water and rubbing alcohol, an isopropyl-based glass cleaner or even screen wash.
Alcohol evaporates off faster than water, and draws out more heat. Remember not to just bung in pure alcohol though. With a hot engine that’s an accident waiting to happen!
The post Intercooler Spray: What It Is & How To Install It appeared first on Fast Car.


